Archive

Author Archive

Testing and Optimization: Implementing insights from Email Summit at accounts payable company

September 27th, 2013

At Email Summit, marketers gather from around the world to hear success stories and case studies from fellow marketers and return to the office with fresh, new ideas. At Email Summit 2013, Rachel Hoppe, Marketing Manager, AvidXchange, shared how she did just that and presented the results from her takeaways from Email Summit 2012.

In this excerpt from her full presentation, “Email Measurement: How a former Email Summit attendee achieved a 270% increase in conversion,” Rachel discusses step six out of her seven-step plan for success she developed after she returned from Summit.


In this video, hear how Rachel and the team at AvidXchange performed tests on their websites using insights learned at Summit.

Learn why Rachel and her team choose to optimize content first, and how they continuously run A/B testing on AvidXchange’s websites.

“I would advocate to test everything. Test even the color of the button, or the format. I always tend to lead with content optimization first, making sure that I can get the eye-path down where it needs to be. Once I can get the content optimized, and then I can focus on graphics,” Rachel said.

This is just a brief look into how Rachel applied what she learned at Summit, and saw positive results. View the entire session  to see how her efforts translated to an increase of sales-qualified leads volume by 105%, and 68% of new revenue sourced through Marketing.

Read more…

B2B Marketing: The first step a systems integrator took to achieve Sales-Marketing alignment

September 16th, 2013

Originally published on B2B LeadBlog

“One of the most important things you can do for your sales team is to generate qualified sales,” Kelly Harman, Vice President, Marketing, Carousel

Industries, said at B2B Summit 2012.

Her presentation, “Make Marketing Indispensable: Strategies for turning the sales team into your biggest fans,” featured steps marketers can take to achieve a productive, cooperative relationship with Sales. To achieve Sales-Marketing alignment beneficial to both teams, Harman and her team of marketers developed a four-step process to provide the tools Sales needed to capture leads and improve transparency between Marketing, Sales and the entire operation at Carousel.

In this video excerpt from Harman’s presentation, learn how her team began their efforts by walking in Sales’ shoes.


“We talked earlier about looking at your website through the eyes of the customer, which is critical, I would ask you to do the same thing and look at the sales tools that you’re creating for the sales people. Look at them through the eyes of the sales person,” Harman explained.

The marketing team at Carousel attended Sales’ meetings, met with Sales afterwards, and discovered they were only using 5% of the tools Marketing put together for lead generation.

In this excerpt, you will learn about the Sales Advisory Group, which was created by Marketing to receive feedback from Sales on industry trends, customer pains and new campaign ideas.

In the full video replay, Harman discussed how after getting a clearer picture of what Sales needed, she and her team provided more useful tools, made it easier for sales reps to find valuable information by creating the “Carousel Insider,” and finally, how the team made the entire department transparent.

Related Resources:

Lead Gen Summit 2013 (September 30 – October 3, 2013 in San Francisco)

Sales-Marketing Alignment: Marketing-qualified lead lift of 25%, lead rejection reduction of 20% with data-driven marketing strategy

Fostering Sales-Marketing Alignment: A 5-Step Lead Management Process

Social Media Marketing: How to use Facebook for customer engagement [Video]

August 6th, 2013

Having a multitude of fans and followers on Facebook is a good thing. However, getting more fans on Facebook does not mean you’re getting more customers. In fact, it could be the opposite.

At MarketingSherpa Email Summit 2013, Jay Baer, President, Convince and Convert, presented, “More Alike than Different: Why email is Madonna, and Facebook is Lady Gaga,” in which he explained the relationship between email and Facebook and how marketers can take advantage of the two channels of communication to customers.

In this excerpt, Jay discussed a myth he spends of half his time working on disproving.


“When we talk about social media, there’s this tremendous myth, and I spend about half my time fighting against this concept. This one concept epitomizes what’s wrong with social media for business today,” Jay said.

Many marketers believe they must have as many fans as possible on Facebook. However, as Jay explained, this is not always a good approach to marketing on Facebook. Having more fans does not necessarily mean you have more customers.

Jay explained 44% of corporate social media marketers look at Facebook as a way to get new customers (Wildfire, 2012), but 84% of fans of company Facebook pages are current or former customers of those companies (DDB, 2011). People who have never used a product or service are less motivated to like it on Facebook.

“We like on Facebook what we actually like,” according to Jay.

Watch this excerpt to learn more about the biggest myth about fans on Facebook, and also how your fans and followers can become accidental marketers for your brand.

View Jay’s full free keynote from Email Summit 2013 to learn why social media and email should be integrated at your company, plus many insights on how to make this possible.

Read more…

Social Media Marketing: Insights from Email Summit keynote Jay Baer

July 30th, 2013

At MarketingSherpa Email Summit 2014, attendees will hear a wide range of case studies and keynote addresses covering many aspects of email marketing.

At last year’s event, Jay Baer, President, Convince and Convert, presented, “More Alike than Different: Why email is Madonna, and Facebook is Lady Gaga,”  in which he explained the relationship between email and Facebook and how marketers can take advantage of the two channels through integration.

In this excerpt from his presentation, filled with 16 ways to integrate email and Facebook into marketing plans, hear highlights from Jay’s session, including why this integration is so essential for businesses, now and especially in the future.


00:10 “If somebody is subscribing to your email newsletter on your website, on your thank you page, why not ask them to also like you on Facebook?” Jay asked, citing many brands he has audited have not tried this approach.

2:26 Jay explained why marketers who are doing advanced segmentation should turn to connecting Facebook accounts to websites to collect information from customers. Instead of having customers fill out a lengthy form with their information, allowing them to connect their Facebook accounts makes it easier on them to give up their information and faster for marketers to collect this essential data.

2:56 Jay revealed in this session how any time a marketer sends something, it is likely only 25% of the audience will see it at any given time. This is precisely why it is essential for marketers to surround customers with many options for communication, including email and social media.

4:08 While the integration tactics discussed in Jay’s keynote address are not difficult technically, they can be difficult to accomplish culturally, operationally and tactically. But, email marketers’ jobs depend on doing these things “because email isn’t going anywhere, but social media is getting a disproportionate amount of attention, and you know that to be true.”


Watch the full, free session from Email Summit 2013 to hear all of Jay’s insights about integrating email and Facebook.

Read more…

Content Marketing: 5 tips for WordPress blogging

May 28th, 2013

When I joined the MECLABS team in January, I was fully aware I would soon become best friends with WordPress. I truly believe WordPress is one of the most efficient ways to put out great content that not only looks polished, but is very simple to use.

Clarity is extremely important when it comes to content, so producing blog posts a reader can understand relies heavily on how it is displayed.

A blog post with photos in random places, sections without a subhead and discussing a process without the use of photos to accompany text are just a few of the millions of ways a reader can get lost in your message.

However, these are all elements you can control.

Here are five tips and tricks I’ve learned to improve a WordPress blog …


Tip #1: Use invisible tables for side-by-side comparisons

Sometimes, if you have just one image in a blog post, you can get away with setting it on the left, right or even in the center of text. This works great especially if your image can stand alone. However, if you have two images (a before and after example, etc.), it is definitely worth taking the extra time to craft an invisible table and place your photos into the code.

Here is an example from the MarketingSherpa blog post in which I placed two examples of an email side by side for easier comparison.
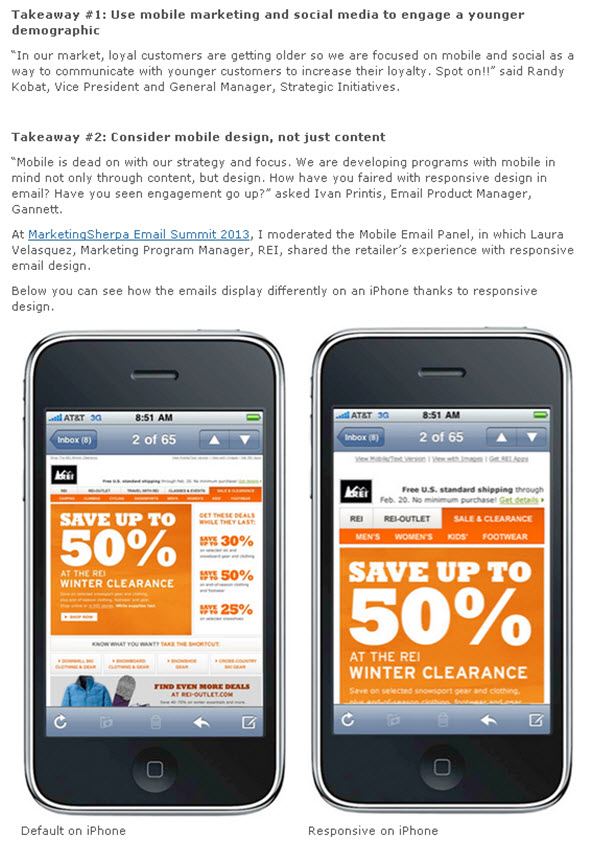
 

As you can see, placing the two images next to each other works well in this case. If they were placed one on top of the other, the reader would lose the before and after effect of the email. I would also recommend adding a caption to the photo, if the meaning without it is not very clear.

Coding an invisible table in HTML is an easy process that takes just a few tweaks. You want to start by uploading your images into the WordPress Media Library. Then, within the actual post, switch from the visual editor to the HTML editor. Next, paste the below code where you want your table to be:

<table style=”border: none;” cellspacing=”10″>
<tbody>
<tr style=”border: none;”>
<td style=”border: none; vertical-align: middle;”><a href=”FILE URL 1“><img class=” wp-image-11378 ” title=”IMAGE TITLE 1” src=”FILE URL” alt=”” width=”xxx” height=”xxx” /></a>CAPTION</td>
<td style=”border: none; vertical-align: middle;”><a href=”FILE URL 2“><img class=” wp-image-11379 ” title=”IMAGE  TITLE 2” src=”FILE URL 2” alt=”” width=”xxx” height=”xxx” /></a>CAPTION</td>
<td style=”border: none; vertical-align: middle;”></td>
</tr>
</tbody>
</table>


Now for the important part. Go back to the Media Library, select “edit” for the image you uploaded, and copy the File URL provided. Paste that URL into your first table box, and return to the upload gallery to grab the image title.

Be mindful if what you’re putting into the table does not match the upload information, it will not work.

Once you put the image title in, you will once again need to put in the same image URL. Finally, include the dimensions of the image, indicated by “xxx” in the example above. There is no need to change “wp-image” number.

Repeat this process for other photos you want to put into the table. It is also easy to make a third or fourth photo in the table: simply copy one of the table boxes, which is the code in between “<td style… and </td>,” and paste it into the code.


Tip #2: Use padding around images to separate from text

When using smaller images, a design that works well is to nestle the photo to the right or left of text. For example, this blog post used a small image placed to the left of the text.

Sometimes, if you put in an image, it may be too close to the text, or might cause strange separation of the text. For example, you might have a lost bullet point separated from the list, or maybe a few words orphaned from the rest of the sentence it belongs to tucked away under an image. To fix this problem, play with the vertical and horizontal space of the image to place the text into a desirable format.

In this MarketingExperiments blog entry, the original design plan was to have images larger in size, centered and acting as separators between paragraphs.

However, with multiple images, it is easier on the eyes and for the reader to have them neatly in the margins, sized smaller, but with the ability to be viewed larger once clicked.
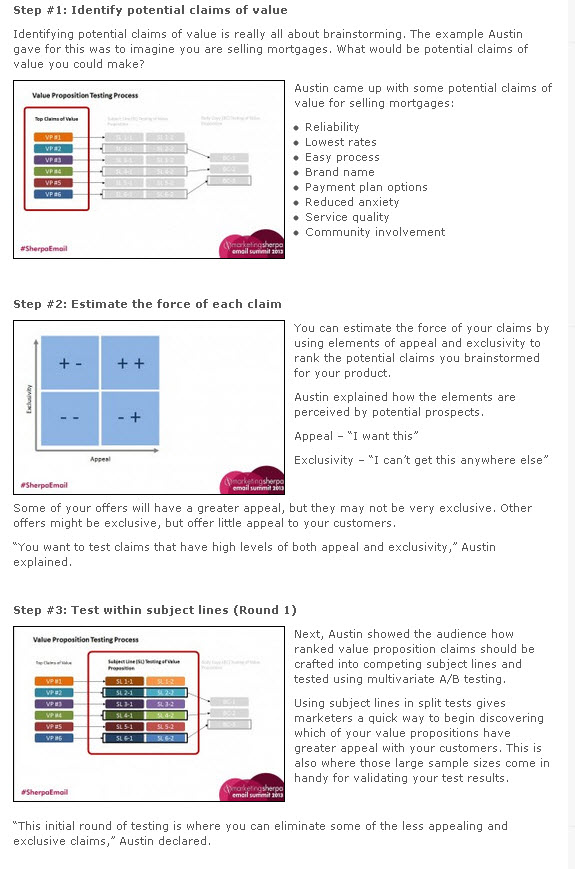
 

Plus, for a post containing steps, having smaller images adds a level of clarity as the reader can fully see the steps in the subheader and the steps of testing, all without having to scroll all over the page.

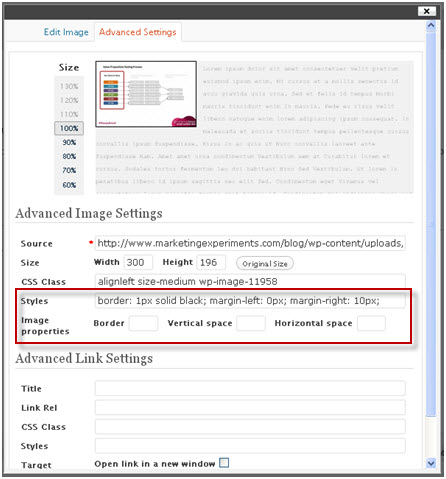
For the first image, it was necessary to add a horizontal space to the right of the photo so the bullet points would not overlap over the image. This was done after the photo was uploaded and set into the appropriate spot to the left of the bullet points.

Vertical spacing is also a great and easy way to make sure there is enough space above and below the image.

One important tip to note is moderation is key – you don’t want to have an image on the left and an image on the right back to back in the body of your content. Try keeping a series of images or photos all on the same side of the page if they are in close proximity of each other.

Then, by selecting the image in the visual editor and selecting Advanced Settings, you can add any amount of space into the options. Here is what I used:
 

Read more…