Archive

Author Archive

Social Media: 4 steps to build your personal brand using LinkedIn

June 13th, 2014

What is personal branding?

A personal brand is an expression of a value proposition.

It is a powerful message that clearly articulates who you are, what you do and how you create value.

When applied to social media, a personal brand creates a memorable first impression that entices visitors to connect with you. When using LinkedIn, a brand message should be the professional version of your value proposition. This brand messaging should be consistent throughout your profile and capture the attention of your visitors.

Here are some tips to establishing a personal brand on LinkedIn.


Step #1. Personalize your URL

In LinkedIn, you have the ability to personalize your public profile URL. A personalized URL is essential to establishing your personal brand as it is not only friendlier from an SEO perspective, but it allows for people to find you more easily.

Here are the steps to personalize your LinkedIn URL:

  1. Log in to LinkedIn.
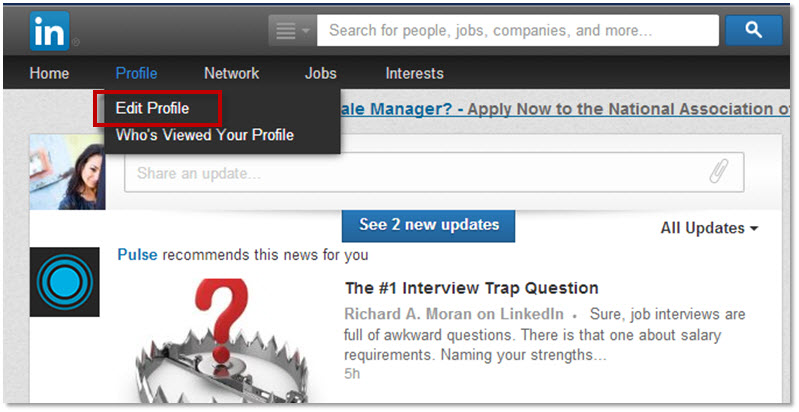
  1. Move your cursor over Profile at the top of the page and select Edit Profile.
linkedin-edit-profile


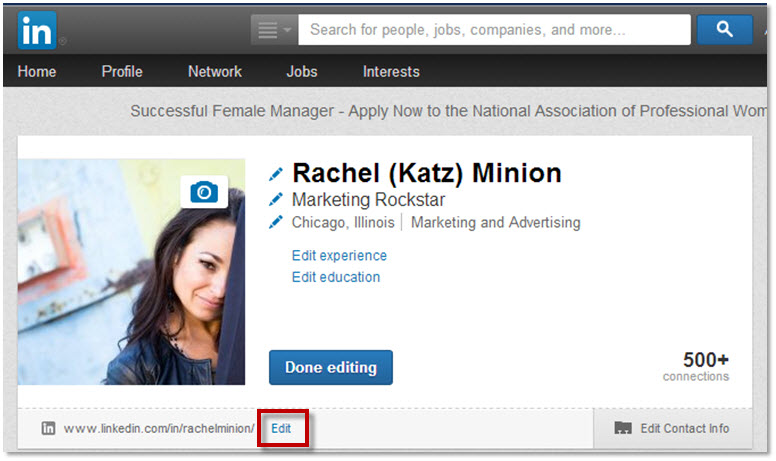
  1. Find your current URL under your profile picture and click Edit.
linkedin-edit-url


  1. In the Your public profile URL box in the bottom right, click Customize your public profile URL.
customize-public-url
  1. Enter your new custom URL in the text box.
  • Your custom URL can have between five and 30 letters or numbers.
  • Do not use spaces, symbols or special characters.
  • You cannot change your URL more than three times in six months.
  • If the URL you want isn’t available, don’t give up. Try adding numbers to the end of the URL or slightly changing the text.
  1. Click Set Custom URL.

Read more…

#TwitterTips: 5 steps for a successful 140-character conversation on Twitter

December 6th, 2013

Tweets are limited to 140 characters, which allows readers to easily digest your content. How do we put out amazing shareable content in such a restricted template? Read on for five tips you can use to create engaging conversations on Twitter.


Step #1. Have a purpose

It’s good practice to begin with a purpose for each piece of content shared on social media platforms. Because Twitter is limited by so few characters, this especially holds true. Every tweet should have a purpose.

Your point has to come across very quickly and at the same time, make your audience want to find out more about what you posted.

When you compose a tweet, imagine how your followers will use that information and how will it help them.

Here are some questions you should ask yourself first to help narrow down your purpose before you tweet:

  • What message are you trying to convey to your audience?
  • Are you trying to influence, promote, sell, provide customer service, or maybe just attract attention?
  • What message do you want the audience to walk away with?
  • Do you want the audience to take action, to be better informed, or simply just be entertained?


Step #2. Learn how to use the medium effectively

Once you have the purpose nailed down, you need to figure out the best way to convey the message to your audience.

You want content that is engaging, purposeful, and most importantly, shareable. Depending on your audience, pairing a tweet with an image may drive the message home to your audience versus just providing a link.

The best way to discover the ideal messaging medium for your audience is by testing and measuring engagement.

There are two things to consider:

  • Is text the best format to put out your message?
  • Could video, links to other pages or images help drive your message?


Step #3. Set the right tone

Depending on your audience and purpose, I recommend conveying your message in a conversational tone that focuses on “customer-speak.”

Many brands focus on promoting messages using unfamiliar language and jargon I call “company-speak,” which often delivers a tone that can be easily perceived as talking “at” your followers rather than talking “to” them.

My point is to aim the tone of your message toward conversation. Here are some examples of tweets with a conversational tone.


Step #4. Hashtags

No blog post on the subject of Twitter could be complete without a conversation on hashtags.

A hashtag is a tool that makes words searchable and allows Twitter users to tap into a conversation around that word.

My recommendation is do not go crazy with hashtags. I suggest using two hashtags per tweet at most. This will help you avoid overwhelming your audience and keep the conversation relevant.

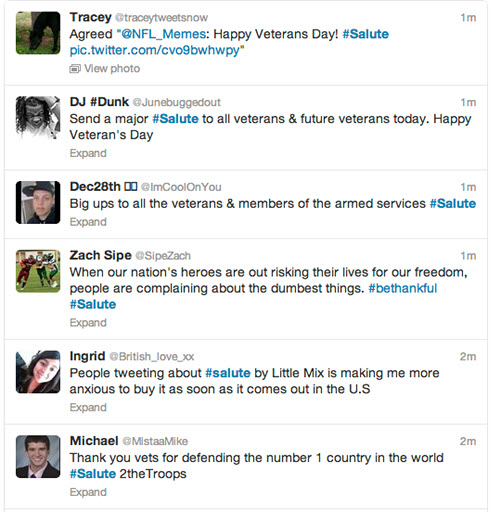
Here are some great examples of how the hashtag “#Salute” was used on Veteran’s Day to give you an idea of how hashtags drive conversation.


Step #5. Have fun

Twitter is a chance to engage with your audience in a setting where creativity and standing out is rewarded.

The example that stands out most for me is Oreo’s infamous Super Bowl tweet. While brand standards and voice guidelines take precedence, don’t forget that fun content can also serve to engage your audience.

Read more…

Social Media Tips: 5 easy steps to set up a Facebook business account

November 1st, 2013

I’ve decided to start a Facebook account. Now what?

To start, we need to determine if we are looking to do a business account or a personal account.

Which type of Facebook account is right for you? For the purpose of this blog post, let’s focus on a business account.

If you are going to have a business account, you must start with a personal account. Facebook business pages are similar to personal timelines. A big difference are the analysis tools Facebook includes for business pages that offer in-depth knowledge to help you see how well you are connecting with your community.

Let’s walk together through setting up a page for your business. Please note that the Facebook landscape changes on a regular basis, so remember you can always visit Facebook’s Help Center for updated instructions.


Step #1. Set up your personal Facebook account

First, you are going to need a personal Facebook account to set up a page for your business.

The reason for this is driven by Facebook limiting your availability to access its business account process without an initial personal account.

If there is a silver lining to this, the business page will not interact with your personal page and your personal information is not public on the business page.

Facebook will allow you to switch back and forth from your personal account to your business account so you can interact as the business on the business page and then simply switch back to your personal account.

In addition, the business page is capable of being managed by multiple administrators if needed. Once additional administrators are set up for the page, each administrator can simply log in to their personal Facebook account to access the business page’s control panel.


Step#2. Select “Create a Page”

You can find this in the “More” section at the bottom of your personal account homepage.


Step #3. Select a page

Which page category should you select? 
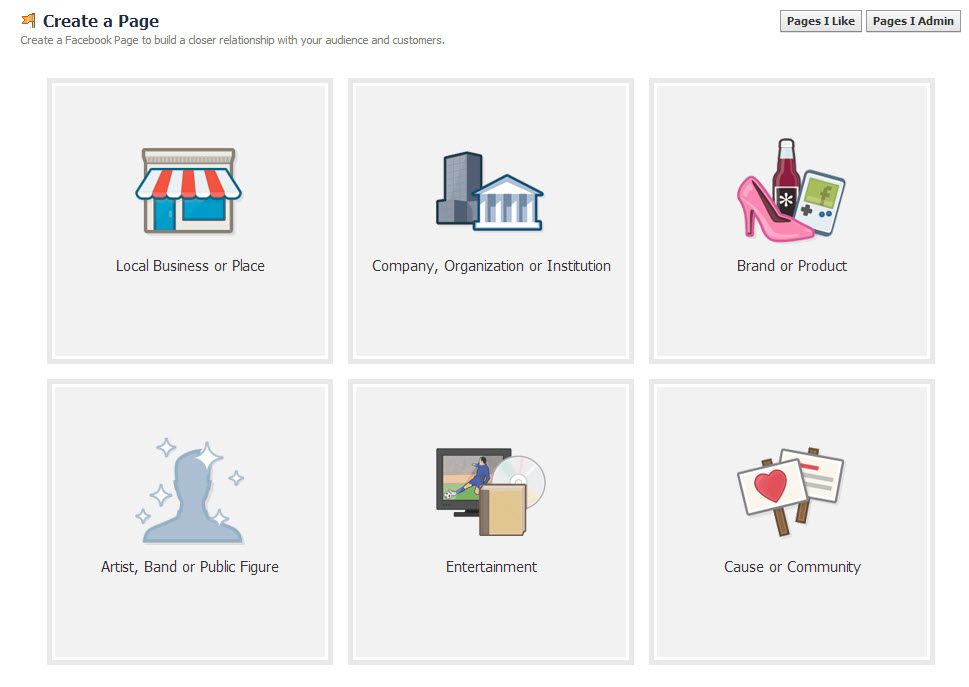
 

Facebook classifies business pages into six major groups. Here’s a breakdown of each group to help you select the right one for your business.


Local Business or Place

  • If you have a brick-and-mortar store where customers physically visit, select the Local Business or Place page.

Company, Organization or Institution

  • If your business is mostly run online or has multiple locations, then you should select the Company, Organization or Institution page.

Brand or Product

  • If your business has products that are sold through multiple websites, resellers and/or retailers, then you will want to select the Brand or Product page.

Artist, Band or Public Figure

  • If you are in the public spotlight and your business is focused on promoting,  the Artist, Band or Public Figure page is the appropriate selection.

Entertainment

  • If you are looking to promote your television show, movie, book, radio station, magazine or other media, select the Entertainment page.

Cause or Community

  • If your organization is a community of action that supports specific issues, campaigns or nonprofit organizations, select the Cause or Community page.


If you feel like you made a mistake in your choice of page, you can always change your page type and category. You can do this after you’ve created the page through the admin control panel.


Step #4. Select your category and get started  

The category selection is just a simple category drop-down list.

After choosing a group that best fits your business, enter the required information for your page, read the terms, and if you agree, check the box and click “Get Started.”

Now that your business page is set up, the hard part is over!


Step #5. Create cover and profile photos  

Facebook allows for a standardized template design with two elements that can be changed on a regular basis.

These two components are:

  • Cover photo
  • Profile photo

These elements are essential to the look and feel of your page. They also serve as free advertising space for your business. Let’s take a more in-depth look at each of them.


Cover photos

Cover photos are the large image at the top center of your page that can serve multiple functions.

The size dimensions for cover photos are 850 pixels by 315 pixels.
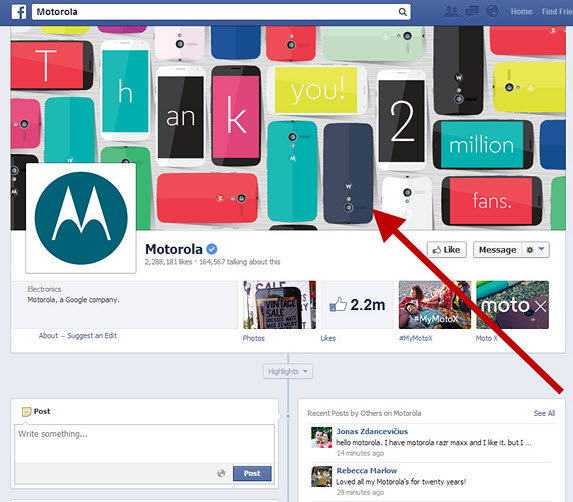
 

To give you an example, let’s take a look at Motorola’s Facebook page.

Motorola has blended images of its products and text to thank fans for their engagement, which leads me to another point.

Cover photos are versatile and only limited to your creativity. They can introduce visitors to your page, promote special offers, provide contact information, and most importantly, help you set the tone of your page.

Even if you are not a designer or have very limited resources, you can still create effective cover photos.

Freeware like GIMP or Paint.net will allow you to size, crop and save your images as needed.

Also, here’s a tip – try not cover more than 20% of the image with text. The reason is Facebook has been rather picky in the past about the amount of text you can use in images.

I also recommend creating multiple cover photos initially, and then upload and swap them out on a weekly basis.

Creating multiple images is hard enough without adding in the reminder to change the cover photo once per week. However, at the moment, when you change your cover photo, your audience will be able to see that photo in their timeline. Another recent MarketingSherpa blog post dives into the details on Facebook’s EdgeRank algorithm.

But for now, I suggest implementing this tactic as a best practice to keep your brand top-of-mind with your Facebook fans. Also, changing out the cover photo on a regular basis to keep your page looking fresh is a good idea.


Profile photos

The profile photo is the square box to the bottom left of the cover photo. The dimensions for profile photos are 180 pixels by 180 pixels.
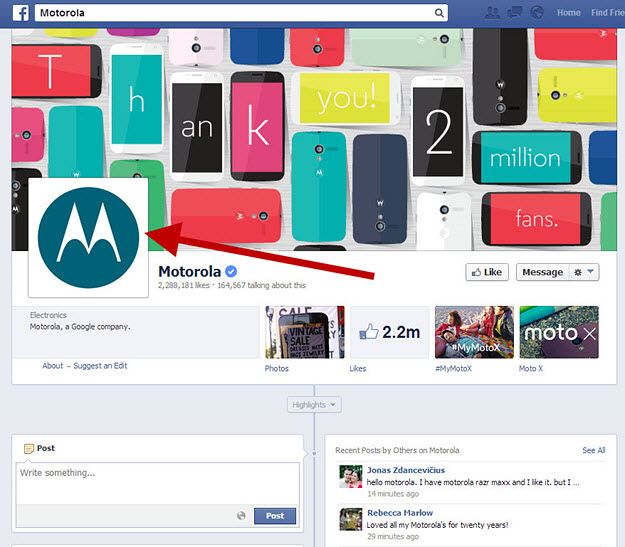
 

Your profile photo serves one main purpose: every time your page posts an update, your profile photo will appear alongside the post on your fans’ timelines.

The profile photo is a small square, so you will want to minimize the amount of text used in this box to maximize the real estate.

A lot of brands safely use a logo in this space for identity, but there is no right or wrong choice here. As I mentioned earlier, your boundaries are the limits of your creativity.

I recommend taking some time to find the right profile image that captures the heart of your business.


Related Resources:

Get the latest inbound and other marketing case studies and data from MarketingSherpa delivered straight to your inbox

Social Media Marketing: A quick look at Facebook EdgeRank

Social Media: 4 simple steps to calculate social media ROI

Social Media Marketing: Why should I like or follow you?

Social Media Marketing: 4 basic tips for getting started

July 16th, 2013

“I’m so far behind. Everyone tells me I need to be on social media, but I don’t know where to get started!”

Today’s MarketingSherpa Blog post is for the late adopters, those not yet deeply engaged in social media marketing.

But even if you are engaged in social media marketing, these tips may help you. Marketers all experience the same type of consternation when it comes to social media and receiving questions like these from peers:

  • Are you on social media?
  • Which platforms are you on?
  • How often do you post?
  • What are your engagement numbers?

Let me put your mind at ease. You are not alone. It’s a pressure we all feel within the industry. Companies large and small experience the same pressures.

  • How do we get noticed?
  • How do we create our social brand image?
  • How do we drive sales from a social-oriented platform?

At MarketingSherpa, we have many more resources to help you dive into the complexities of social media marketing and I’ll end this blog post with a few links to help you answer some of the above questions. But first, let’s back it up a bit, and take a 10,000-foot view of the essential elements of any social media marketing endeavor.


Essential Element #1. Realistic goals

To start, we need to keep this in perspective.

Does social interaction and engagement directly correlate to conversion? No.

So, if social interaction does not directly create conversions, what are we spending our time, money and resources on? While we cannot directly correlate brand engagement, brand recognition and brand interaction with engagement on a social media platform, we can say the personality and presence of a brand helps to inform consumers and keep them engaged in the conversation.


Essential Element #2. Organic conversations

First of all, we do not need to be on every single platform to get to the next level. Start with one platform (i.e., Facebook, Twitter, LinkedIn, YouTube, Vimeo, Vine, Instagram, Pinterest, etc.) and start the conversation.

To start a conversation, we need to understand our audience wants to engage in an interaction. Start by asking questions (i.e., I’m having a case of the Mondays, how are you doing today? or TGIF! What are you planning this weekend?) then move on to talking about what you do or want to promote.

Obviously, these questions should be relevant to your brand. The goal is to engage visitors in a conversation and keep it going.

Ask more questions, respond and follow up. You do not want to be that company that puts something out there and doesn’t respond. It’s the same as sending a message to a friend to ask them out to dinner, having them respond to you and never setting a date or time.


Essential Element #3. A (growing) community

Grow your following.

I know! I know! How do I grow my brand’s following?

Once you pick where to start and you have a conversation going with your followers, this is an easy transition.

Let’s talk about the demographic you are targeting. Let’s get specific. I know. This is a hard thing to do. This is where you are probably saying “Come on Rachel, my product is perfect for everyone.” I get it.  I’ve had the same trouble myself.

So, let’s pick your top demographic and go from there. Pick your top demographic and find out:

  • Where they visit
  • Who they follow
  • What they read about.

Why is this important? It’s simple. Once you know where they go, start networking.

Social media marketing is all about the connections and creating conversations. For example, if I’m looking to help a company that is coaching boys soccer, where would I go? What would I search for?

I’d start searching locally. I would Google the top Facebook pages for the area by typing “Jacksonville” and “boys soccer” and “facebook.”

This search criteria would pull together the right information for my competition – Facebook pages I should start interacting with.

Read more…