Content Marketing: 5 tips for WordPress blogging
When I joined the MECLABS team in January, I was fully aware I would soon become best friends with WordPress. I truly believe WordPress is one of the most efficient ways to put out great content that not only looks polished, but is very simple to use.
Clarity is extremely important when it comes to content, so producing blog posts a reader can understand relies heavily on how it is displayed.
A blog post with photos in random places, sections without a subhead and discussing a process without the use of photos to accompany text are just a few of the millions of ways a reader can get lost in your message.
However, these are all elements you can control.
Here are five tips and tricks I’ve learned to improve a WordPress blog …
Tip #1: Use invisible tables for side-by-side comparisons
Sometimes, if you have just one image in a blog post, you can get away with setting it on the left, right or even in the center of text. This works great especially if your image can stand alone. However, if you have two images (a before and after example, etc.), it is definitely worth taking the extra time to craft an invisible table and place your photos into the code.
Here is an example from the MarketingSherpa blog post in which I placed two examples of an email side by side for easier comparison.

As you can see, placing the two images next to each other works well in this case. If they were placed one on top of the other, the reader would lose the before and after effect of the email. I would also recommend adding a caption to the photo, if the meaning without it is not very clear.
Coding an invisible table in HTML is an easy process that takes just a few tweaks. You want to start by uploading your images into the WordPress Media Library. Then, within the actual post, switch from the visual editor to the HTML editor. Next, paste the below code where you want your table to be:
<table style=”border: none;” cellspacing=”10″>
<tbody>
<tr style=”border: none;”>
<td style=”border: none; vertical-align: middle;”><a href=”FILE URL 1“><img class=” wp-image-11378 ” title=”IMAGE TITLE 1” src=”FILE URL” alt=”” width=”xxx” height=”xxx” /></a>CAPTION</td>
<td style=”border: none; vertical-align: middle;”><a href=”FILE URL 2“><img class=” wp-image-11379 ” title=”IMAGE TITLE 2” src=”FILE URL 2” alt=”” width=”xxx” height=”xxx” /></a>CAPTION</td>
<td style=”border: none; vertical-align: middle;”></td>
</tr>
</tbody>
</table>
Now for the important part. Go back to the Media Library, select “edit” for the image you uploaded, and copy the File URL provided. Paste that URL into your first table box, and return to the upload gallery to grab the image title.
Be mindful if what you’re putting into the table does not match the upload information, it will not work.
Once you put the image title in, you will once again need to put in the same image URL. Finally, include the dimensions of the image, indicated by “xxx” in the example above. There is no need to change “wp-image” number.
Repeat this process for other photos you want to put into the table. It is also easy to make a third or fourth photo in the table: simply copy one of the table boxes, which is the code in between “<td style… and </td>,” and paste it into the code.
Tip #2: Use padding around images to separate from text
When using smaller images, a design that works well is to nestle the photo to the right or left of text. For example, this blog post used a small image placed to the left of the text.
Sometimes, if you put in an image, it may be too close to the text, or might cause strange separation of the text. For example, you might have a lost bullet point separated from the list, or maybe a few words orphaned from the rest of the sentence it belongs to tucked away under an image. To fix this problem, play with the vertical and horizontal space of the image to place the text into a desirable format.
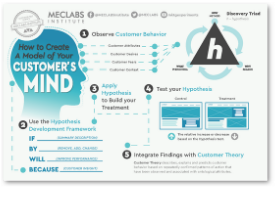
In this MarketingExperiments blog entry, the original design plan was to have images larger in size, centered and acting as separators between paragraphs.
However, with multiple images, it is easier on the eyes and for the reader to have them neatly in the margins, sized smaller, but with the ability to be viewed larger once clicked.

Plus, for a post containing steps, having smaller images adds a level of clarity as the reader can fully see the steps in the subheader and the steps of testing, all without having to scroll all over the page.
For the first image, it was necessary to add a horizontal space to the right of the photo so the bullet points would not overlap over the image. This was done after the photo was uploaded and set into the appropriate spot to the left of the bullet points.
Vertical spacing is also a great and easy way to make sure there is enough space above and below the image.
One important tip to note is moderation is key – you don’t want to have an image on the left and an image on the right back to back in the body of your content. Try keeping a series of images or photos all on the same side of the page if they are in close proximity of each other.
Then, by selecting the image in the visual editor and selecting Advanced Settings, you can add any amount of space into the options. Here is what I used: